Time in Winnipeg

journal
profile
tagboard
affiliates
archives
Tuesday, October 28
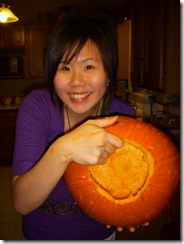
my happy pumpkin! 1:59 PMI know the title sounds weird, haha. Still, I'm just uber fascinated over my first shot at carving my own Halloween pumpkin; and a rather cute and happy one at that! And I know my cheery end-product brightened up some of you too when I uploaded the pics right? Haha. :D
So yes, it was yet another first-time Halloween party experience at Laura's last Sunday. And really, her parents had extended this invitation just because I'd mentioned (when we first met 2 months ago) that we don't celebrate Halloween proper in Singapore, and I'd love to know how it's like to carve a pumpkin. I guess it's just so heartwarming and sweet that they remembered and organized this specially for us international students. And since we've been hanging out these days, Laura asked Thalia, Adriana, Judy and Anne over as well to join in the fun.


Once again, Mrs. Fox'd put in utmost effort in decorating the house, taking care of lil' details like laying out glow-in-the-dark spiders, ghost confetti and other things on the dinner table - even the butter was in the shape of mummies and bats! There were also make-believe tombstones and cobwebs draped over the staircase railings.. Laura says her mum loves holidays and tends to over-decorate, heh.


Playing around and fiddling with the little ornaments here and there..


Mini pumpkin gourds and ghost-buster nametags. And these are some really neat witches' finger cookies, with sharp almond bits sticking out for long fingernails, and little spurts of red jam for blood!
PC 101: Pumpkin-Carving by Prof Wini
I've gotten many questions regarding this, whether it's difficult to master pumpkin-carving and if I could teach it. So I've decided to log the process in a foolproof guide, complete with pictures! HAHA.
Step 1 - Choose your pumpkin

Choosing your pumpkin is important - grab a big, brightly-coloured, maybe even a flawless looking one! (Of course, if you intend to make an evil-faced pumpkin you can prolly forgo the last part.) Haha.. but yea, that's us rushing to grab our pumpkins! Mrs. Fox prepared 1 each for us international students, whereas the locals shared (Laura and Dave to 1, Judy and Anne to another).
Step 2 - Draw the lid and cut it out
It's important to note the lid must neither be too small nor too big! The former makes it difficult for you to stick your arm in thereafter, while the latter just makes your pumpkin look weird, heh. Do place the blade at an angle while cutting too, so the lid doesn't fall right through when it's done! Oh, and you're supposed to cut away the "hairy" gutter on the inside of the finished lid, too..
Step 3 - Clean the insides, inside-out!

Using a spoon, scrape the insides and remove all the spaghetti-looking strands and pumpkin seeds (these can either be roasted or made into pumpkin pie at the end, so I've heard). But yep, this really requires you to get down and dirty - no matter how wrong it sounds - so be prepared for a dirty job that'll possibly stain your arms, clothes, or leave random pumpkin bits in your hair (which was what happened to me, I dono whose pumpkin bits kept flying across the table..)!

Mr. Fox, our shifu at pumpkin-carving. He was like holding a craft workshop for all of us la, heh. My pumpkin had the cleanest inside anyway! :)
Step 4 - Draw and carve your desired pumpkin-face
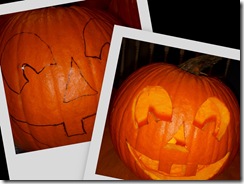
It'll be wise to use a non-permanent marker for this step, so you can make revisions to your drawing. Mrs. Fox thoughtfully prepared sample pictures of Halloween pumpkins so we could draw inspiration from them, and I decided to go for a bug-toothed happy pumpkin - tada, see the before and after effect!
Oh oh, I need to say that one of its teeth actually dropped out cos I pressed it too hard from the inside! But Mr. Fox taught me how to do pumpkin-surgery by sticking a toothpick into the broken piece and attaching it back, heh. See my pumpkin's just like me, it visits the dentist - now the tooth's flawless..!
Step 5 - Show off, compare (and even name) your pumpkins!

Left: Judy and Anne's evil pumpkin, versus mine
Right: Joyous friendly pumpkins - direct replicas of their owners, haha
Anne then asked me what I'd like to name my pumpkin (no, you don't actually have to if you don't wish to) - I thought of naming it after Vicki or Christine initially, which I thought might be cute. But I didn't think Vicki'd like to have a pumpkin named after her somehow, haha. And Chris, I guess you're probably the only one who'll find it an honour lor!! But ya, I guess my pumpkin does have nice big eyes like Vicki's (wah), and a killer-toothy-grin like Chris's (she contended it herself too, haha). Then Judy and Anne told me people don't usually name pumpkins after their friends.. boo. :( By the way, theirs has a cool name - the one above on the left side - called Eli Frank Jthor the First (?!)! Haha.
AND FINALLY.. lights out and lighting up! 

Tea-light candles are carefully placed inside then lit. It's like a Western mid-autumn festival!


Before/after.. really WAH. We marveled at them glowing in the dark for a long time.. they were so pretty!


Getting high on pumpkins! The enormous one in the middle is Mr. Fox's - he loves carving gigantic ones every year so his is specially purchased from a farm! Heh.


Getting into some action with my prized possession (this is the only "thing" I've kissed ever since I came to Canada anyway, haha). Btw I had a shot of me on the broomstick but it didn't look too good, hehe.
Halloween celebrations are such a blast in North America! :)
Profile

Reach me!
Wini’s pfingo number: 31501405
Call me at only local (Singapore) phone charges when I’m online!
Mail me!
Winifred Lim
Arthur V Mauro Residence, Box 436B
120 Dafoe Road, Winnipeg, MB R3T 6B3
Canada
About me
You are an enthusiastic innovator, always seeing new possibilities and new ways of doing things. You have a lot of imagination and initiative for starting projects, and a lot of impulsive energy for carrying them out. You are stimulated by difficulties and are most ingenious in solving them. You can get so interested in your newest project that you have time for little else. Your energy comes from a succession of new enthusiasms and your world is full of possible projects. Your enthusiasm gets other people interested too.
Your feeling preference shows in a concern for people. You are skillful in handling people and often have remarkable insight into the possibilities and development of others. You are extremely perceptive about the attitudes of others, aiming to understand rather than judge people. You are much drawn to counseling and can be inspired and inspiring teacher, particularly where you have freedom to innovate. With talent, you can succeed in almost any field that captures your interest.
A difficulty for you is that you hate uninspired routine and find it remarkably hard to apply yourself to sometimes necessary detail unconnected with any major interest. Worse yet, you may get bored with your own projects as soon as the major problems have been solved or the initial challenge has been met. You may need to learn to follow through and finish what you have begun, but are happiest and most effective in jobs that permit one project after another, with somebody else taking over as soon as the situation is well in hand.
Hearsay? Say here.